*네트워크-데이터통신/Github API 사용(*레트로핏(Retrofit) 및 converter-gson, Glide 라이브러리)
*레트로핏(Retrofit)라이브러리
-데이터통신 라이브러리
-레트로핏 사용을 위해서는 인터페이스 정의 필수
-레트로핏 인터페이스는 호출방식, 주소, 데이터 등을 지정함
-레트로핏 라이브러리는 인터페이스를 해석해 HTTP통신을 처리하고 데이터를 가져옴
*converter-gson 라이브러리
-레트로핏에서 JSON 데이터를 사용하기 위해 사용하는 부가적인 라이브러리
*Glide 라이브러리
-가져올 데이터 중 이미지 데이터 주소가 포함되어 있을 때 HttpURLConnection을 직접 구현하여 이미지를 화면에 보여줄 수 있음
-HttpURLConnection직접 구현 시 효율성이 떨어짐
-대신 이미지를 화면에 보여주는 기능을 가진 로딩 라이브러리 사용
-로딩 라이브러리 : URL주소만 알려주면 해당 이미지가 있는 서버에 접속해 이미지를 다운로드하여 이미지뷰에 보내는 도구
-로딩 라이브러리 종류 중 Glide와 피카소를 많이 사용함
-Glide 홈페이지 : https://github.com/bumptech/glide
*깃허브 사용자 정보를 가져오는 앱 구현(Github API사용)
-Retrofit, converter-gson, Glide 라이브러리 사용
-JSON To Kotlin Class 플러그인을 사용하여 JSON형식의 텍스트 데이터를 코틀린 클래스로 변환
-적용할 JSON형식의 데이터(Github API) : https://api.github.com/users/Kotlin/repos
-build.gradle
-- android{} 에 뷰바인딩 추가
--dependencies{} 에 라이브러리 추가
//뷰바인딩
buildFeatures{
    viewBinding true
}
//레트로핏, converter-gson, glide 라이브러리 추가
//화면 상단 Open클릭 - Dependencies - + - library
//retrofit2:retrofit
//retrofit2:converter-gson
//bumptech.glide:glide 추가
dependencies {
implementation 'com.github.bumptech.glide:glide:4.14.2'
implementation 'com.squareup.retrofit2:retrofit:2.9.0'
implementation 'com.squareup.retrofit2:converter-gson:2.9.0'
-AndroidManifest.xml
--인터넷 권한 추가
<!--  인터넷 권한 추가  -->
    <uses-permission android:name="android.permission.INTERNET"/>

    <application

        android:usesCleartextTraffic="true"
-MainActivity.kt
/**깃허브 사용자 정보를 가져오는 앱 개발**/

//1
//레트로핏, converter-gson, glide 라이브러리 추가
//build.gradle(:app)

//2
//인터넷 접근을위한 권한 추가
//AndroidManifest.xml

//3
//안드로이드는 JSON형식으로 된 텍스트 데이터를 코틀린 클래스로
//간단하게 변환해주는 플러그인 JSON To Kotlin Class 을 지원함
//상단 메뉴 Android Studio - Preference - Plugins
//JSON To Kotlin Class 검색 후 설치

//4
//기본패키지 우클릭 - New - Kotlin data class File from JSON
//웹 브라우저에서 가져올 JSON형식 텍스트 데이터 복사 붙여넣기
//https://api.github.com/users/Kotlin/repos
//클래스명 Repository 설정 - Generate

//변환된 데이터 클래스 자동생성 됨
//(License, Owner, Repository, RepositoryItem)

//License, Owner: JOSN데이터가 JSON오브젝트를 값으로 사용하는 경우
//해당 데이터 이름으로 클래스 생성하여 사용

//Repository, RepositoryItem: Repository클래스는
//RepositoryItem의 배열을 상속받는 형태로 생성됨
//실제 데이터 구조는 RepositoryItem클래스에 생성됨

//5
//데이터를 출력할 화면 만들기
//activity_main.xml, recyclerView사용

class MainActivity : AppCompatActivity() {

    //뷰바인딩
    val binding by lazy { ActivityMainBinding.inflate(layoutInflater) }

    override fun onCreate(savedInstanceState: Bundle?) {
        super.onCreate(savedInstanceState)
        setContentView(binding.root)

        //7
        //데이터 요청을위해
        //커스텀 어댑터를 생성하여 어댑터변수 생성
        //레이아웃 리사이클러뷰 어댑터에 커스텀 어댑터 연결
        val adapter = CustomAdapter()
        binding.recyclerView.adapter = adapter

        //7-1
        //리사이클러뷰 리니어 레이아웃 매니저 연결
        binding.recyclerView.layoutManager = LinearLayoutManager(this)

        //8
        //Retrofit.Builder()를 사용해 레트로핏 생성하여
        //baseUrl이 되는 깃허브 도메인 주소와 JSON데이터를
        //Repository클래스의 컬렉션으로 변환해주는 컨버터 입력 후
        //build()메서드 호출하여 생성하여 변수에 담아 변수 생성
        val retrofit = Retrofit.Builder()
            .baseUrl("https://api.github.com")
            .addConverterFactory(GsonConverterFactory.create())
            .build()

        //9
        //버튼을 클릭하면 레트로핏을 이용해 데이터를 불러오고 어댑터에 세팅할 코드 작성
        //요청버튼을 클릭리스너 연결
        binding.btnRequest.setOnClickListener {

            //10
            //레트로핏 create() 메서드에
            //인터페이스를 파라미터로 넘겨주면
            //실행 가능한 서비스 객체를 생성해 반환해줌
            val githubService = retrofit.create(GithubService::class.java)
            //11
            //githubService는 GithubService인터페이스를 이용해 객체를 생성했기에
            //실행가능한 상태의 users()메서드를 가지고 있음
            //레트로핏 create() 메서드는 인터페이스를 실행가능한 객체로 만들면서
            //users()메서드 안에 비동기 통신으로 데이터를 가져오는
            //enqueue()메서드를 추가해 놓음...
            //enqueue()메서드가 호출되면 통신이 시작됨

            //enqueue()메서드 호출 후 깃허브API 서버로부터 응답을 받으면
            //enqueue()안에 작성하는 콜백 인터페이스가 작동하게 됨
            //enqueue()파라미터로 콜백 인터페이스를 구현해야함
            //콜백 인터페이스 구현 후 필수 메서드 2가지 구현...
            githubService.users().enqueue(object: Callback<Repository>{

                override fun onResponse(
                    call: retrofit2.Call<Repository>,
                    response: Response<Repository>
                ) {
                    //11-1
                    //통신이 성공적이면 onResponse메서드 호출
                    //두 번째 파라미터인 response의 body()메서드 호출 시
                    //서버로부터 전송된 데이터를 꺼낼 수 있음
                    //꺼낸 데이터를 Repository로 형변환 후 어댑터의 userList에 담음
                    adapter.userList = response.body() as Repository
                    //11-2
                    //어댑터로 리사이클러뷰에 변경된 사항 반영
                    adapter.notifyDataSetChanged()
                }

                override fun onFailure(call: retrofit2.Call<Repository>, t: Throwable) {
                }

            })

        }//btnRequest

    }//onCreate

}//MainActivity

//6**********
//레트로핏을 사용해 데이터를 조회하여 가져오고
//어댑터를 통해 목록에 출력하는 코드 작성

//레트로핏 사용을 위해서는 인터페이스 정의 필수*****
//레트로핏 인터페이스는 호출방식, 주소, 데이터 등 지정
//레트로핏 라이브러리는 인터페이스를 해석해 HTTP통신을 처리함
interface GithubService{

    //6-1
    //Github Api를 호출할 users메서드 생성
    //반환값은 Call<데이터클래스>형태로 작성
    //Call클래스 사용 시 retrofit2패키지 선택
    //레트로핏은 인터페이스에 지정된 방식으로 서버와 통신하고 데이터를 가져옴

    //@GET 어노테이션을 사용해 요청 주소 설정
    //요청주소는 Github도메인 제외하고 작성
    @GET("users/Kotlin/repos")
    fun users(): retrofit2.Call<Repository>
}
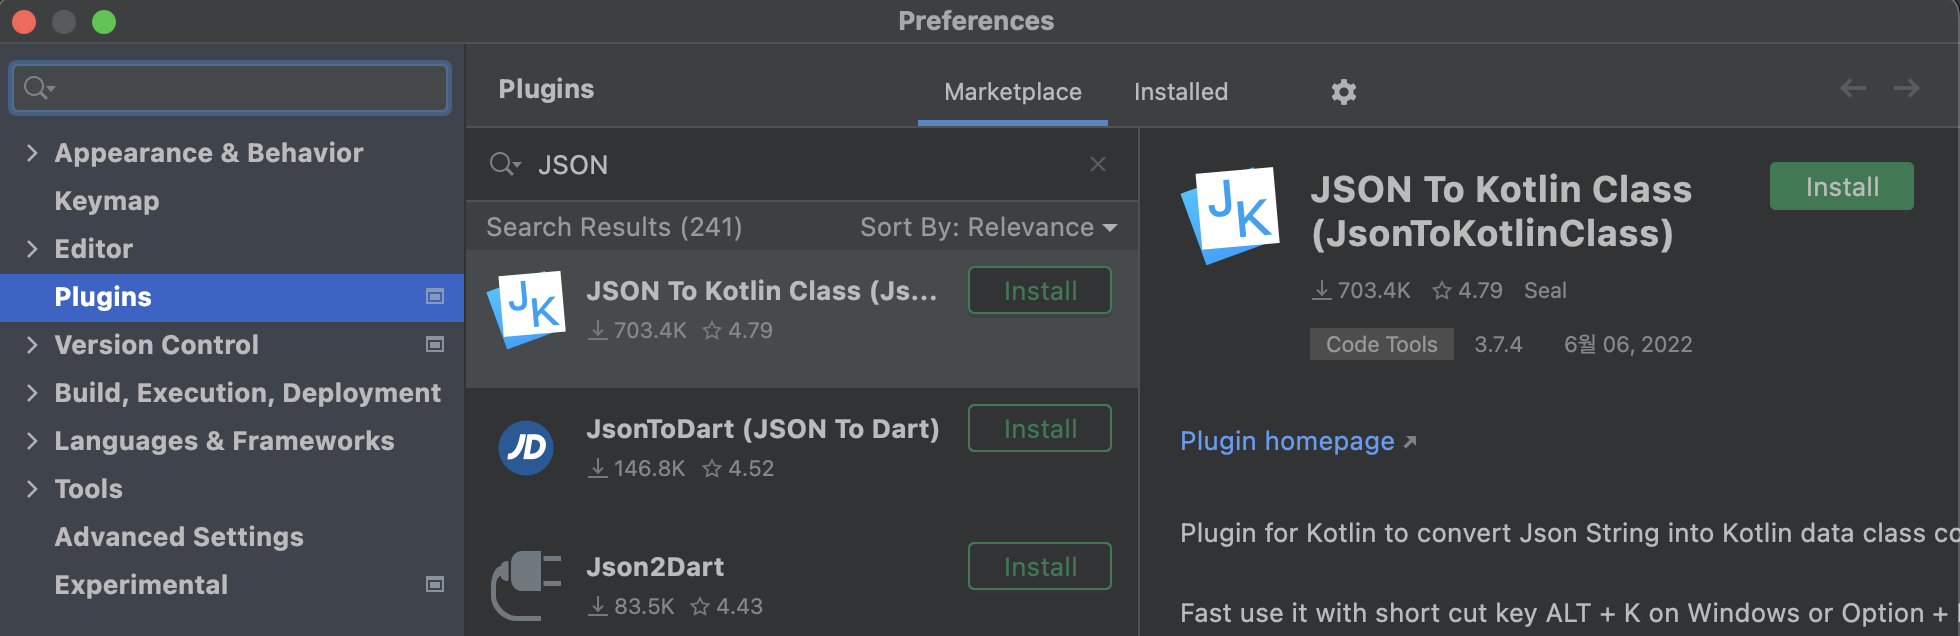
-JSON To Kotlin Class 설치
--안드로이드는 JSON형식으로 된 텍스트 데이터를 코틀린 클래스로 간단하게 변환해주는 플러그인 JSON To Kotlin Class 지원
--상단 메뉴 Android Studio - Preference - Plugins - JSON To Kotlin Class 검색 후 설치
-Repository클래스 생성
--기본패키지 우클릭 - New - Kotlin data class File from JSON
--웹 브라우저에서 가져올 JSON형식 텍스트 데이터 복사 붙여넣기(https://api.github.com/users/Kotlin/repos)
--클래스명 Repository 설정 - Generate
--변환된 데이터 클래스 자동생성 : License, Owner, Repository, RepositoryItem
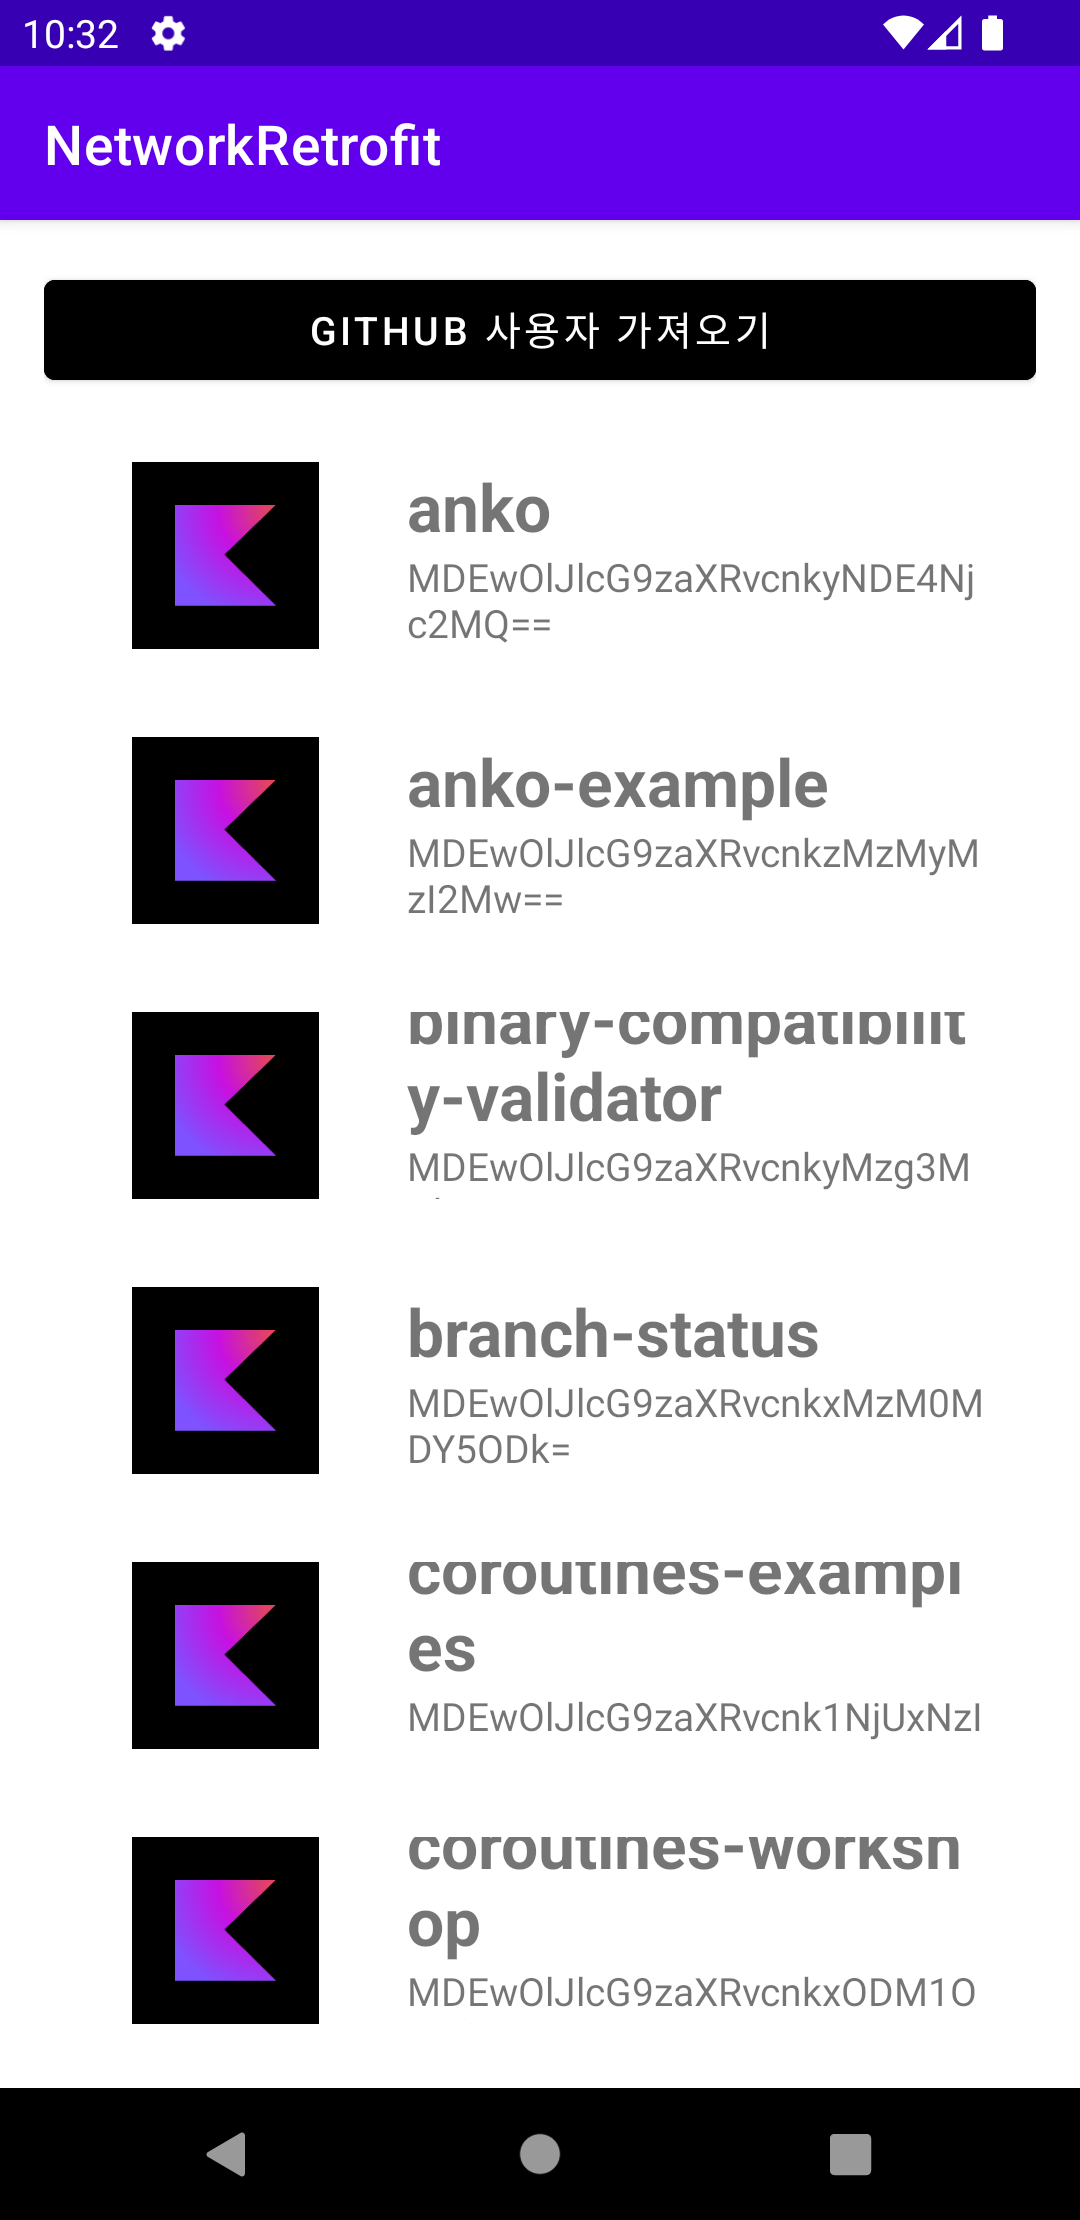
-activity_main.xml
<?xml version="1.0" encoding="utf-8"?>
<androidx.constraintlayout.widget.ConstraintLayout xmlns:android="http://schemas.android.com/apk/res/android"
    xmlns:app="http://schemas.android.com/apk/res-auto"
    xmlns:tools="http://schemas.android.com/tools"
    android:layout_width="match_parent"
    android:layout_height="match_parent"
    android:padding="16dp"
    tools:context=".MainActivity">

<!--  깃허브 데이터 API주소를 요청할 버튼, 리사이클러 뷰 생성  -->
    <Button
        android:id="@+id/btnRequest"
        android:layout_width="match_parent"
        android:layout_height="wrap_content"
        android:backgroundTint="@color/black"
        android:text="github 사용자 가져오기"
        app:layout_constraintEnd_toEndOf="parent"
        app:layout_constraintStart_toStartOf="parent"
        app:layout_constraintTop_toTopOf="parent" />

    <androidx.recyclerview.widget.RecyclerView
        android:id="@+id/recyclerView"
        android:layout_width="0dp"
        android:layout_height="0dp"
        android:layout_marginTop="8dp"
        app:layout_constraintBottom_toBottomOf="parent"
        app:layout_constraintEnd_toEndOf="parent"
        app:layout_constraintStart_toStartOf="parent"
        app:layout_constraintTop_toBottomOf="@+id/btnRequest" />

<!--  리사이클러뷰 안에 넣을 아이템을 위한 레이아웃 생성 item_recycler.xml -->

</androidx.constraintlayout.widget.ConstraintLayout>
- item_recycler.xml
<?xml version="1.0" encoding="utf-8"?>
<androidx.constraintlayout.widget.ConstraintLayout xmlns:android="http://schemas.android.com/apk/res/android"
    xmlns:app="http://schemas.android.com/apk/res-auto"
    android:layout_width="match_parent"
    android:layout_height="100dp"
    android:padding="16dp">

<!--  이미지뷰1개와 텍스트뷰2개 생성  -->
    <ImageView
        android:id="@+id/imageView"
        android:layout_width="100dp"
        android:layout_height="match_parent"
        app:layout_constraintBottom_toBottomOf="parent"
        app:layout_constraintStart_toStartOf="parent"
        app:layout_constraintTop_toTopOf="parent" />

    <TextView
        android:id="@+id/textName"
        android:layout_width="0dp"
        android:layout_height="wrap_content"
        android:layout_marginStart="16dp"
        android:text="이름"
        android:textSize="24dp"
        android:textStyle="bold"
        app:layout_constraintBottom_toTopOf="@+id/textId"
        app:layout_constraintEnd_toEndOf="parent"
        app:layout_constraintStart_toEndOf="@+id/imageView"
        app:layout_constraintTop_toTopOf="parent" />

    <TextView
        android:id="@+id/textId"
        android:layout_width="0dp"
        android:layout_height="wrap_content"
        android:layout_marginStart="16dp"
        android:text="아이디"
        app:layout_constraintBottom_toBottomOf="parent"
        app:layout_constraintEnd_toEndOf="parent"
        app:layout_constraintStart_toEndOf="@+id/imageView"
        app:layout_constraintTop_toBottomOf="@+id/textName" />

<!--  사용자 정보를 목록으로 보여주기 위해 리사이클러뷰 어댑터 생성  -->
<!--  패키지 우클릭 - CustomAdapter클래스 생성  -->

</androidx.constraintlayout.widget.ConstraintLayout>
- CustomAdapter.kt
//2
//RecyclerView의 Adapter상속받고 제네릭으로 Holder지정 후
//3개 필수 메서드 자동 생성
class CustomAdapter: RecyclerView.Adapter<CustomAdapter.Holder>() {

    //3
    //어댑터에서 사용할 데이터 컬렉션 변수 생성
    //사용할 데이터는 Repository클래스(아이템을 가지고 있는 배열...)사용
    //nullable로 선언
    var userList: Repository? = null

    //5
    //홀더를 생성하는 onCreateViewHolder
    //레이아웃을 인플레이트한 후 바인딩에 담아 홀더에 반환
    override fun onCreateViewHolder(parent: ViewGroup, viewType: Int): Holder {
        val binding = ItemRecyclerBinding.inflate(LayoutInflater.from(parent.context),parent,false)

        return Holder(binding)
    }

    //6
    //실제 목록에 뿌려지는 아이템을 그려주는 onBindViewHolder
    //현재 위치의 사용자 데이터를 userList에 가져와
    //아직 만들어지지 않은 홀더의 setUsers()메서드에 넘김
    override fun onBindViewHolder(holder: Holder, position: Int) {
        val user = userList?.get(position)
        holder.setUsers(user)
    }

    //4
    //목록에 출력되는 총 아이템 개수 구현
    override fun getItemCount(): Int {
        return userList?.size?: 0
    }

    //1
    //이너 클래스로 Holder클래스 생성
    //홀더의 생성자에서 바인딩을 전달받고
    //상속받은 ViewHolder에 binding.root전달
    inner class Holder(val binding: ItemRecyclerBinding): RecyclerView.ViewHolder(binding.root){
        //7
        //setUser()메서드 구현
        //1개의 RepositoryItem을 파라미터로 사용
        //userList가 nullable이기 때문에
        //userList의 현재위치를 담고있는 user변수도 nullable임
        fun setUsers(user: RepositoryItem?){
            //8
            //홀더가 가지고 있는 아이템 레이아웃에
            //데이터 하나씩 세팅
            //사용하는 데이터: 아바타주소, 사용자이름, 사용자아이디
            //RepositoryItem에는 각 데이터 이름을 사용함
            //아바타주소: user.owner.avatar_url
            //사용자이름: user.name
            //사용자아이디: user.node_id
            user?.let {
                //8-1
                //사용자 이름과 아이디 세팅
                binding.textName.text = user.name
                binding.textId.text = user.node_id
                //8-2
                //Glide.with를 사용하여 이미지 주소를 이미지뷰 안에 로드
                Glide.with(binding.imageView).load(user.owner.avatar_url).into(binding.imageView)
            }
        }//setUsers

    }//Holder

    //9
    //레트로핏을 사용해 데이터를 조회하여 가져오고
    //어댑터를 통해 목록에 출력하는 코드 작성
    //MainActivity.kt작성

}//CustomAdapter
-결과
이 포스팅에 작성한 내용은 고돈호, ⌜이것이 안드로이드다⌟, 한빛미디어(주), 2022 에서 발췌하였습니다.
'Android App > Kotlin' 카테고리의 다른 글
| 파이어베이스(Firebase)-프로젝트 생성 (0) | 2022.12.12 |
|---|---|
| 네트워크-데이터통신/Open API 사용, 마커설정(*레트로핏(Retrofit) 및 converter-gson, Glide 라이브러리) (1) | 2022.12.09 |
| 네트워크-데이터통신(레트로핏(Retrofit)라이브러리, JSON) (1) | 2022.12.07 |
| 네트워크-데이터 통신(HttpURLConnection) (0) | 2022.12.06 |
| 네트워크-HTTP (0) | 2022.12.06 |