*네트워크-데이터 통신(HttpURLConnection)
-안드로이드는 HTTP로 데이터 통신을 하기 위해 HttpURLConnection 클래스 지원
-HTTPS(보완 강화된 버전의 프로토콜) 사양으로 확장한 HttpsURLConnection 클래스 지원
-네트워크도 파일과 동일하게 요청하는 스마트폰에서 서버쪽의 데이터를 읽는 도구로 스트림 사용
-HttpURLConnection연결 시 파일에서 File클래스를 사용한 것처럼 서버의 기본정보를 읽어올 수 있음
-실제 데이터를 읽어오기 위해 HttpURLConnection에서 InputStream(읽기 전용 스트림)을 꺼내 사용
*HttpURLConnection사용하기
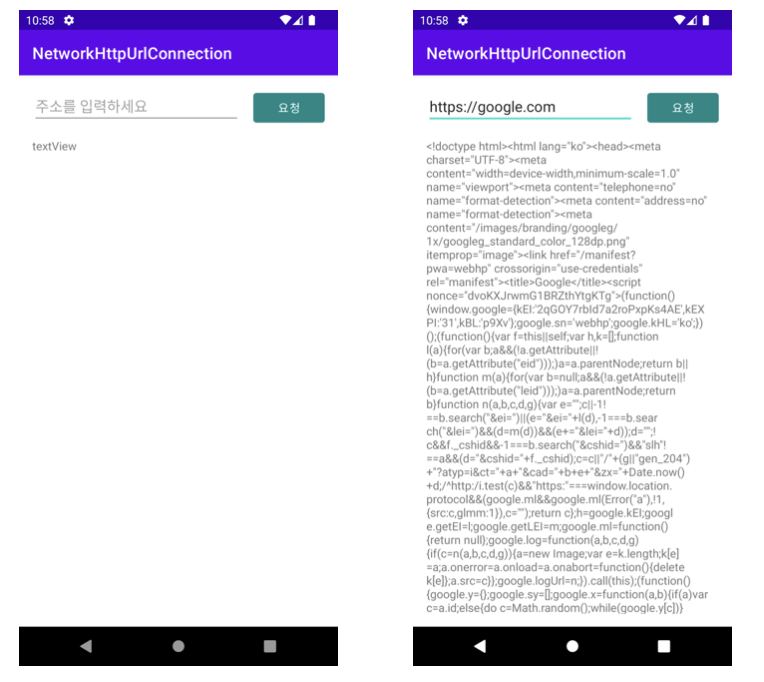
-웹 페이지 주소를 입력하여 서버로부터 응답받은 웹 페이지의 코드를 화면에 출력하는 앱 구현
-build.gradle
-- android{} 에 뷰바인딩 추가
//뷰바인딩
buildFeatures{
    viewBinding true
}
-AndroidManifest.xml
<!--  인터넷 접근 권한 명세  -->
    <uses-permission android:name="android.permission.INTERNET"/>

<!--  http주소에 대해 강화된 네트워크 보안정책으로 인한 오류 예외처리를 위해  -->
<!--  android:usesCleartextTraffic="true" 설정  -->
    <application

        android:usesCleartextTraffic="true"
-MainActivity.kt
import androidx.appcompat.app.AppCompatActivity
import android.os.Bundle
import com.heeyjinny.networkhttpurlconnection.databinding.ActivityMainBinding
import kotlinx.coroutines.CoroutineScope
import kotlinx.coroutines.Dispatchers
import kotlinx.coroutines.launch
import java.io.BufferedReader
import java.io.InputStreamReader
import java.net.HttpURLConnection
import java.net.URL

/**웹 페이지 주소를 입력하여 서버로부터 응답받은 웹 페이지 코드를 화면에 출력하는 앱 만들기**/

//1
//인터넷 접근 권한 명세
//AndroidManifest.xml 작성

//2
//주소 입력받을 editText, 요청 Button
//응답 받은 코드 출력할 textView 추가
//activity_main.xml 작성

class MainActivity : AppCompatActivity() {

    //뷰바인딩
    val binding by lazy { ActivityMainBinding.inflate(layoutInflater) }

    override fun onCreate(savedInstanceState: Bundle?) {
        super.onCreate(savedInstanceState)
        setContentView(binding.root)

        //3
        //요청버튼 클릭 시 코드실행
        binding.btnRequest.setOnClickListener {

            //4
            //버튼 클릭 시 백그라운드에서 네트워크 작업 요청하기위해
            //코루틴스코프 생성하고 디스패처 IO사용
            CoroutineScope(Dispatchers.IO).launch {

                //7
                //try-catch문으로 감싸서 예외처리하기(5~6코드)
                //네트워크관련 코드는 예외로 치명적인 오류(앱 다운)발생 위험이 있음
                //try 문에서 Exception 예외가 발생할 경우
                //catch (Exception e) 로 빠져서 그 안의 실행문을 실행하는 구조
                try {

                    //5
                    //주소입력 필드에 입력된 주소를 가져오기
                    //http의 주소는 보안 문제가 있으며 http를 사용하기 위해
                    //AndroidManifest.xml에 설정이 필요함...
                    //만약 설정을 하지 않았다면
                    //url의 앞이 https로 시작하지 않았을 때 https로 변경하는 코드 작성
                    var urlText = binding.editUrl.text.toString()
                    if (!urlText.startsWith("https")){
                        urlText = "https://${urlText}"
                    }

                    //5-1
                    //주소를 URL객체로 변환하고 변수에 저장
                    val url = URL(urlText)

                    //5-2
                    //openConnection()메서드에서 반환되는 값은
                    //URLConnection이라는 추상(설계)클래스임
                    //이 추상클래스를 사용하기 위해서는 실제 구현클래스를 사용해야되므로
                    //HttpURLConnectiond으로 형변환 시킴

                    //서버와의 연결을 생성하기 위해
                    //URL객체에서 openConnection()메서드를 사용하고
                    //HttpURLConnection으로 형변환
                    val urlConnection = url.openConnection() as HttpURLConnection

                    //5-3
                    //연결된 커넥션에 요청방식 설정
                    //HTTP메서드를 사용하며 대문자로 입력
                    urlConnection.requestMethod = "GET"

                    //6
                    //응답이 정상(HttpURLConnection.HTTP_OK) 이면 응답 데이터 처리
                    if (urlConnection.responseCode == HttpURLConnection.HTTP_OK){

                        //6-1
                        //실제 데이터를 읽어오기 위해서는
                        //HttpURLConnection에서 InputStream 이라는 읽기전용 스트림 꺼내 사용
                        //데이터를 읽어오는 입력스트림(InputStreamReader)에
                        //커넥션 스트림 연결
                        val streamReader = InputStreamReader(urlConnection.inputStream)
                        //6-2
                        //커넥션 스트림을 연결한 데이터를 읽어오는 스트림을
                        //버퍼에 담아 읽을 준비
                        val buffered = BufferedReader(streamReader)

                        //6-3
                        //반복문을 돌면서 읽어온 데이터를
                        //한 줄씩 읽어와 content변수에 저장
                        val content = StringBuilder()
                        while (true){
                            //읽을 데이터가 없을 때 break설정
                            val line = buffered.readLine()?:break
                            content.append(line)
                        }
                        //6-4
                        //사용한 스트림과 커넥션 모두 해제
                        buffered.close()
                        urlConnection.disconnect()

                        //6-5
                        //화면의 텍스트뷰에 content에 저장된 데이터 값 입력
                        //화면 텍스트뷰(UI)에 값을 세팅하기 때문에 Main디스패처 사용함
                        launch(Dispatchers.Main){
                            binding.textContent.text = content.toString()
                        }

                    }//if Http_OK

                }catch (e: Exception){

                    //7-1
                    //catch에 e.printStackTrace()메서드 사용
                    //e.printStackTrace() : 예외발생 시 로그를 출력하며
                    //서브스레드로 동작하기 때문에 print문 사용보다 성능이 좋음
                    e.printStackTrace()

                }

            }//코루틴스코프

        }//btnRequest click

    }//onCreate
}//MainActivity
-activity_main.xml
<?xml version="1.0" encoding="utf-8"?>
<androidx.constraintlayout.widget.ConstraintLayout xmlns:android="http://schemas.android.com/apk/res/android"
    xmlns:app="http://schemas.android.com/apk/res-auto"
    xmlns:tools="http://schemas.android.com/tools"
    android:layout_width="match_parent"
    android:layout_height="match_parent"
    android:padding="16dp"
    tools:context=".MainActivity">

<!--  에디트텍스트, 버튼, 텍스트뷰 추가  -->

    <EditText
        android:id="@+id/editUrl"
        android:layout_width="0dp"
        android:layout_height="wrap_content"
        android:hint="주소를 입력하세요"
        android:layout_marginEnd="16dp"
        app:layout_constraintEnd_toStartOf="@+id/btnRequest"
        app:layout_constraintStart_toStartOf="parent"
        app:layout_constraintTop_toTopOf="parent" />

    <Button
        android:id="@+id/btnRequest"
        android:layout_width="wrap_content"
        android:layout_height="wrap_content"
        android:backgroundTint="@color/teal_700"
        android:text="요청"
        app:layout_constraintEnd_toEndOf="parent"
        app:layout_constraintTop_toTopOf="parent" />

    <TextView
        android:id="@+id/textContent"
        android:layout_width="0dp"
        android:layout_height="0dp"
        android:text="textView"
        android:layout_marginTop="16dp"
        app:layout_constraintBottom_toBottomOf="parent"
        app:layout_constraintEnd_toEndOf="parent"
        app:layout_constraintStart_toStartOf="parent"
        app:layout_constraintTop_toBottomOf="@+id/editUrl" />

</androidx.constraintlayout.widget.ConstraintLayout>
-결과
이 포스팅에 작성한 내용은 고돈호, ⌜이것이 안드로이드다⌟, 한빛미디어(주), 2022 에서 발췌하였습니다.
'Android App > Kotlin' 카테고리의 다른 글
| 네트워크-데이터통신/Github API 사용(*레트로핏(Retrofit) 및 converter-gson, Glide 라이브러리) (0) | 2022.12.07 |
|---|---|
| 네트워크-데이터통신(레트로핏(Retrofit)라이브러리, JSON) (1) | 2022.12.07 |
| 네트워크-HTTP (0) | 2022.12.06 |
| 지도-구글 지도(현재 위치 지도 구현-LocationRequest.create()사용중단) (0) | 2022.12.06 |
| 지도-구글 지도(마커, 카메라 및 뷰 설정) (0) | 2022.12.05 |